
Developing Event Action Handlers for the FileNet P8 Content Engine
Introduction
Event actions in combination with subscriptions are a very powerful feature of the IBM FileNet P8 Content Engine. As it is a server based feature, it provides a way to implement business logic without any client side code and changes to the standard user interface. Because event action handlers run in the context of the application server running the Content Engine, they can tedious to write and to deploy.
This article shows how to code the event action handlers and how to use the infrastructure around event actions to your full advantage. This is illustrated with some sample event action handlers. It also points out the situations where custom events can be very handy and how to use them.
This article assumes that the reader is familiar with the basics of the event action mechanism and is capable of creating event actions and subscriptions. For more information see the FileNet P8 documentation.
Starting from version 5.1 of the Content Engine there are some new server side features. Now you can also write event action handlers in Javascript instead of Java. New are also the Change Preprocessor Actions. These can be a solution when you encounter situations where event actions don’t apply.
Change preprocessors are discussed in depth in the follow-up on this article in the post Developing Change Preprocessors for the FileNet P8 Content Engine.
A “Hello, World!” event action handler
The core of an event action handler is a Java class implementing the com.filenet.api.engine.EventActionHandler interface. This interface has one method with the following signature:
public void onEvent(ObjectChangeEvent event, Id subscriptionId) throws EngineRuntimeException;
A basic event action handler is a Java class which only implements this method. To make it a little bit meaningful we will add some logging to it. The event action handler is running in the context of the application server, so logging is essential for building and debugging the code. The best logging method depends on the application server you are using. For instance, the preferred logging method for the IBM WebSphere application server is the so called java.util.logging method, which is the name of a package of the Java SDK containing the logging classes. See the article “A developer’s guide for WebSphere Application Server logging” for more information about this topic. The code below will use the logger to present some information about the event and subscription it received. It will be an indication that you have configured your subscription and event action correctly:
import java.util.logging.Logger;

// other imports skipped

public class SimpleEventActionHandler implements EventActionHandler {

    private static final String CLASS_NAME = SimpleEventActionHandler.class.getName();
    private static Logger logger = Logger.getLogger( CLASS_NAME );

    public void onEvent(ObjectChangeEvent event, Id subscriptionId ) throws EngineRuntimeException {
        logger.info("Event: " + event.getClassName() );
        logger.info("subscriptionId " + subscriptionId.toString() );
        logger.info("Hello, World!");
    }
}
Deploying the event action handler
The next step is to deploy this event action handler to the Content Engine. In a development situation you will be doing this a lot of times, so it is important that this can be done efficiently. There are two possible methods to deploy an event action handler.
The first method is to add the Java class to the class path of the Content Engine. This means that every time you want to change the Java class you have to restart the application server hosting the Content Engine. This is not a very productive way in a development situation.
The second method is to create a so called Code Module. A Code Module is a document where the content elements of the document can be either a compiled Java class or a jar-file. The Java class implementing the interface, and all it dependent classes are stored on the Content Engine as one single document using the CodeModule document class. The creation of the Code Module document is part of the creation of the event action. The following UML diagram shows the relation between the code module class and the event action class:
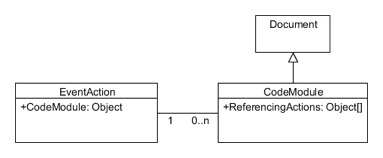
The event action class has a property called CodeModule which point to a specific version of a Code Module. The Code Module class has a read only counterpart called ReferencingActions pointing to all the event actions using this code module version.
You can deploy a new version of the Code Module by performing the following steps:
- Do a checkout of the existing Code Module document.
- Do a check in with the new set of compiled Java classes as the content of the document.
Now the
CodeModuleproperty of the event action must point to the latest version of the code module document. All these operations can be done using the Content Engine Enterprise Manager: - Use the ‘Copy object reference’ action from the context menu of the code module.
- Use the ‘Paste object’ action on the CodeModule property of the event action.
Starting from version 5.1 of the Content Engine the “Check In Content” dialog has a option to update all the Action class instances pointing to a previous version of the Code Module. The steps pointed out here are no longer necessary. However using an automated way to update the Event Action is still quicker.
As this procedure is quicker to carry out then waiting for a restart of the application engine it still require some manual actions. The solution presented here is to use a Java utility class to carry out all the necessary actions. A typical event action handler project does not need a main class, so this class can be added as the main class to the project. The first time it will take more time to setup, but after that re-deploying has become very easy. The source code attached to this article contains a Java class called CodeModuleManager doing all the magic. Here we will only show a very short part of the code to get a general idea how to use the class:
public class CodeModuleManager {
    com.filenet.api.core.ObjectStore objectStore;

    public CodeModuleUpdater(ObjectStore objectStore) {
        this.objectStore = objectStore;
    }

    public void update(String name, Collection<File> files) {
        updateCodeModule(files, getCodeModule(name) );
        updateReferencingActions( getCodeModule(name) );
    }

    // The rest of the code...
}
The entry point to the class is the update() method, taking the name of the Code Module and a collection of files as its arguments. After you add this class to your project you have to make your project runnable by adding a main class, the proper libraries and command line arguments. The “Developing Applications with IBM FileNet P8 APIs” Red Book can help you to achieve this task. Assuming that you have this all in place and fetched an object of the class com.filenet.api.core.ObjectStore pointing to your Content Engine, then you can use the following code to use the class:
CodeModuleManager codeModuleManager = new CodeModuleManager(objectStore);

Collection<File> files = new ArrayList<File>();
files.add(new File("c:/temp/MyEventActionHandler.class" ) );
files.add(new File("c:/temp/MyHelperClass.class") );

codeModuleManager.update("MyCodeModule", files);
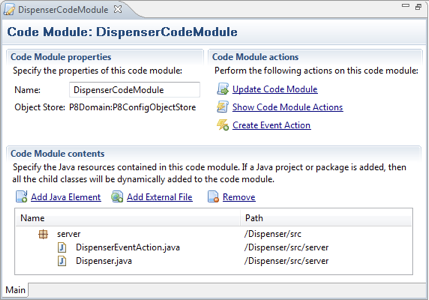
This code will update the Code Module and all the associated event actions. A solution integrated in the Eclipse IDE for updating the code module and the event actions can be found at www.ecmdeveloper.com. This website features a free open source Eclipse plug-in targeting FileNet P8 developers. This plug-in contains a code module editor. With this code module editor the content of the code module can be configured and easily updated. The screen shot below will give you a general idea of the editor.
Now that we know how to develop, deploy and update code modules, let’s start writing a real one.
A real world event action handler: a number dispenser
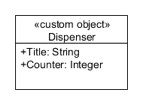
In his article “Writing great code with the IBM FileNet P8 APIs, Part 3: Take a number”, Bill Carpenter showed how to use the FileNet P8 Content Engine to dispense unique numbers. Here we will use Event Actions to apply these unique numbers automatically to objects created in the Object Store. The code presented in the article uses a Custom Object with a custom property holding the latest number that was dispensed. So the first step is to create a custom property of type integer called Counter. This property is assigned to a new Custom Object class called Dispenser. Also the string property Title is added to the Dispenser class as a name property. This way an instance of the Dispenser class can be easily looked up by its path name. The property template for this property is on most systems already present. Your Dispenser class will now look like this UML diagram:
Now that this class definition infrastructure is in its place we can switch to the Java code. The number dispensing logic is encapsulated in a Java class called Dispenser with the getNextValue() method as the interface to the outer world. The class has logic to deal with the case when multiple clients are simultaneously requesting a number. In this case each client will still get its unique number. The class contains a field of the Java type CustomObject called dispenser that has to be initialized. This is done in the constructor of the class. A fetch less instantiation will suffice, so we use the getObject() method of an Object Store object to initialize the variable. By skipping some code already present in the original article the Dispenser Java class looks like this:
public class Dispenser {
    private static final String DISPENSER_CLASS_NAME = "Dispenser";
    private static final String COUNTER_PROPERTY_NAME = "Counter";

    // Skipped some static stuff

    private final CustomObject dispenser;

    public Dispenser(ObjectStore objectStore, String dispenserPath ) {
        dispenser = Factory.CustomObject.getInstance(objectStore,DISPENSER_CLASS_NAME, dispenserPath)
    }

    public int getNextValue(boolean feelingUnlucky) {
        // Code from the dispenser article
    }
}
This dispenser class will be used by the DispenserEventActionHandler event action handler class, which will actually apply the unique numbers to the objects in the Object Store. In this class the dispenser is wrapped in the following method, also converting the integer value to a string:
private String getValueFromDispenser(ObjectStore objectStore,String path) {
    Dispenser dispenser = new Dispenser( objectStore, path );
    int value = dispenser.getNextValue(false);
    return Integer.toString(value);
}
The implementation of the onEvent() method from the DispenserEventActionHandler interface looks like this:
public void onEvent(ObjectChangeEvent event, Id subscriptionId)
    throws EngineRuntimeException {

    ObjectStore objectStore = event.getObjectStore();
    String propertyName = "DocumentId";
    String dispenserPath = "/Dispensers/MyDispenser";
    Document object = Factory.Document.fetchInstance(objectStore,
        event.get_SourceObjectId(), null);
    String value = getValueFromDispenser(event.getObjectStore(),dispenserPath);
    object.getProperties().putValue(propertyName, value );
    object.save( RefreshMode.NO_REFRESH );
}
In this code we assume you want to fill the documentId string property of a custom document class with a unique value. The event parameter of the onEvent() method has a method called get_SourceObject() which returns the object that was created. However this is not the actual object but as the documentation says a “shallow copy”, so this object cannot be used to modify the underlying Object Store object. Therefore a fresh copy is fetched using the method get_SourceObjectId() of the event object.
To deploy this event action you can use the Enterprise Manager to perform the following steps:
- Create an instance of the
DispenserCustom Object class with the nameMyDispensercontained in a folder calledDispensers. The value of theCounterproperty must be set to some initial value. - Create a new event action. While creating a new event action you can create a new Code Module using the compiled versions of the Java classes
DispenserEventActionHandlerandDispenseras the content. - After this step you have to add a subscription to the custom document class triggering on the creation event using the event action from the previous step. This event action handler modifies the source object. Modifications to the source object are only supported when using asynchronous subscriptions. So make sure that you use an asynchronous subscription.
If you create a new document using the custom document class, each document should now get a unique, consecutive number. If you don’t use versioning for this document then you are already finished. However, if you are using versioning, then there remains one problem to be fixed. The creation event used to trigger the Event Action, also “fires” when you check out an existing document because the reservation document is created. In this case each version of the document will get a unique number. If this is undesired behavior then you could add Java code to the event action handler to fix this.
However, a much easier solution is to use the filter property of the subscription. The filter property holds an expression which is evaluated against the source object. The syntax of the expression is similar to the WHERE clause of a query. The event action is only triggered if the source object matches this expression. The following expression will only create a new number when a new document is created as either a major or a minor version:
((MajorVersionNumber=1 and MinorVersionNumber=0 and VersionStatus=1) or (MajorVersionNumber=0 and MinorVersionNumber=1 and (VersionStatus=2 or VersionStatus=3)))
The VersionStatus property of a document is used here. This is an integer value which indicates the current version state of a document version. The possible values are “released” (1), “in-process” (2), “reservation” (3) or “superseded” (4). If you want only the first major version of the document to get a unique number, then the expression can be simplified to:
(MajorVersionNumber=1 and MinorVersionNumber=0 and VersionStatus=1)
Improving the number dispenser event action
The event action code presented above has a few flaws that we will try to solve in this section. This first one is pretty obvious, the hard coded values for the property name and the dispenser path:
String propertyName = "DocumentId";
String dispenserPath = "/Dispensers/MyDispenser";
You could decide to read these properties from a configuration file located somewhere on the class path. However this would not solve the second flaw in the code, the possibility for only one number dispenser for all the classes using the dispenser. In this case the subscription comes to the rescue. One of the properties of a subscription is the user string property, according to the property description a “string with no built-in behavior”. The maximum length of this property is 255 characters. This property can be accessed from the Content Engine Enterprise Manager in the properties tab of the subscription.

The following code can be used to fetch the user string of the subscription that triggered the event action:
private static final PropertyFilter PF_USER_STRING = new PropertyFilter();

static
{
    PF_USER_STRING.addIncludeProperty(1, null, null, PropertyNames.USER_STRING, null);
}

private String getUserString(ObjectChangeEvent event, Id subscriptionId) {
    Subscription subscription = Factory.Subscription.fetchInstance(
        event.getObjectStore(),subscriptionId, PF_USER_STRING);
    return subscription.get_UserString();
}
Because we are only interested in the value of the user string, a PropertyFilter object is constructed. This object does not change between different invocations of the code module and therefore is initialized in a static block. This is also in general a good practice for all static data that does not change between different invocations. Next the Subscription object is fetched, using the id of the subscription.
We want to configure two properties, so we have to pack two values into one string. In this case a very simple solution is sufficient. The two values are concatenated to one user string with a comma as a separator. We use the split() method of the Java String class to separate the two values from each other:
String userString = getUserString(event, subscriptionId );
String[] parts = userString.split(",");
if ( parts.length != 2) {
    return;
}
String propertyName = parts[0].trim();
String dispenserPath = parts[1].trim();
If the user string cannot be properly split into two parts, then the event action code will do nothing and simply return. Note that there is a many-to-one relationship between the Subscription and the Event Action; multiple subscriptions may use the same Event Action. Each Subscription is coupled to its own Dispenser Custom Object and a property name. If you use this modified code, different dispensers can be used to service different document classes.
Another flaw worth mentioning is the use of a Document object in the code. This prevents the Event Action from being used for something other than a document. A more generic approach makes use of the get_SourceClassId() method of the event object. Using this method the object is fetched as an IndependentlyPersistableObject, which also includes folders or custom objects:
String classId = event.get_SourceClassId().toString();
Id objectId = event.get_SourceObjectId();
IndependentlyPersistableObject object = (IndependentlyPersistableObject) objectStore.getObject(classId, objectId);
The rest of the code can be used unchanged. Now the same event action can be used to set unique numbers on instances of folders and custom objects. (If you think that IndependentlyPersistableObject is a really long class name you will be in for a surprise later).
Custom events
One of the nice features of the FileNet P8 Content Engine event mechanism is the possibility to define custom events. Custom events classes are created as subclasses from the CustomEvent class which is a child of the ObjectChangeEvent class. Custom events can be created and raised from code using the API.
A common use case for custom events is to trigger an event action from the client side. A typical scenario would be a business rule demanding that the change an object in the object store requires the change of other objects in the object store. If you are not sure if the initiating user has sufficient access rights on the other object store items to perform the additional changes, the operation may fail. By delegating the changes to the event action you are creating a controlled, server side, environment where you are sure of sufficient access rights to complete the action.
Custom events can also be used for specific auditing needs. Out-of-the box the Content Engine auditing mechanism is coupled to generic events such as creation, checking in and deleting. If in a custom application you are using a specific folder as a trashcan then filing a document in that particular folder signifies some specific action. You could define a “Trashing event” raised each time a document is filed in the folder. Now the trashing action can be audited with the document that was trashed as the source object. The required integer property EventStatus can be used to indicate if the action was successful or unsuccessful.
Here we will use the custom event mechanism in combination with our beloved number dispenser in another manner. Suppose the unique number must be set on a document when it is filed in a particular folder. The anatomy of the FileEvent class is slightly different from the CreationEvent class we saw previously. If a document is filed into a folder the source object points to an instance of a DynamicReferentialContainmentRelationship class (as promised before, an even longer class name). The Head property of this object points to the document being filed. We could change the original event action handler to handle this new situation or introduce a custom event and leave the original event action handler unchanged. As this section deals with custom events we obviously choose for the somewhat artificial option of a custom event. We will see later in this section that this custom event can also be used in a standalone situation.
The class name of the new custom event is DocumentFiledEvent and it is created as a subclass of the CustomEvent class using the FileNet Enterprise Manager. Although possible, no extra properties are added to the event class. We will use an event action to instantiate the custom event. The Java class used for the event action handler is called DocumentFiledEventActionHandler. The code looks like this:
public class DocumentFiledEventActionHandler implements EventActionHandler {

    public void onEvent(ObjectChangeEvent event, Id subscriptionId)
        throws EngineRuntimeException {

        if ( event.get_SourceObject() instanceof DynamicReferentialContainmentRelationship ) {
            DynamicReferentialContainmentRelationship relationship =
                (DynamicReferentialContainmentRelationship) event.get_SourceObject();
            IndependentObject object = relationship.get_Head();
            if ( object instanceof Document ) {
                raiseCustomEvent((Document) object);
            }
        }
    }

    private void raiseCustomEvent(Document document) {
        ObjectStore objectStore = document.getObjectStore();
        CustomEvent customEvent = Factory.CustomEvent.createInstance(objectStore,"DocumentFiledEvent" );
        customEvent.set_EventStatus( new Integer(0) );
        document.raiseEvent(customEvent);
        document.save(RefreshMode.NO_REFRESH);
    }
}
The code in the onEvent() method makes sure that we are dealing with a document being filed into a folder. After that is established, the raiseCustomEvent() method creates the actual custom event object. Notice that you have to call the save() method of the document object to actually raise your custom event. This code is coupled to a new Event Action called DocumentFiledEventAction. To achieve what we want, we need two subscriptions:
- First a subscription has to be placed on the folder where you have to file the document receiving the unique number. This can be either a folder class or a specific instance of a folder. This subscription is coupled to the
DocumentFiledEventActionand triggered with the “File Event”. - The second subscription is placed on the class of the documents receiving the unique number. This subscription is coupled to the previously discussed
DispenserEventActionand triggered by the custom “Document Filed Event”. Make sure that you supply the correct configuration for the dispenser in the user string.
Now that all the pieces are in place, the document should get a unique number if it is filed in the configured locations. Filing the document in the folder triggers the DocumentFiledEventAction, this creates a “Document Filed Event” triggering the DispenserEventAction.
You can also use custom events to trigger work flow subscriptions. The benefit of using the “Document Filed Event” to start a work flow is that the document being filed can be the launching attachment of the work flow. This is in contrast with the normal file event which gives you an instance of a DynamicReferentialContainmentRelationship class. To take this on step further you could use custom events to start work flows based on business logic that cannot be configured with the standard configuration methods. The business logic is placed in client code or an event action handler and a custom event is raised whenever the specific conditions are met. This custom event will on his turn trigger the start of a work flow.
Conclusion
This article showed how to develop event action handlers for use with the FileNet Content Engine. We presented a Java class which, once it is properly setup, will reduce the time to re-deploy the Java code to the Content Engine. The number dispenser example showed how the event action handler and subscription can work together to build robust and re- usable solutions. Finally Custom Events where discussed, giving you different possibilities how to benefit from this feature.
Leave a Comment